
When you make advertising on FacebookIn fact, one of the most important things you can do to improve your chances of success is to measure and analyze your visitor audiences. By understanding who's visiting your website and what they're doing there, you can fine-tune your marketing efforts and make sure you're targeting the right people with the right messages. To measure this data, one of the tools at our disposal is the Facebook Pixel.
What is the Facebook pixel?
What is it?
The Facebook pixel is a valuable tool for measuring campaign performance. It lets you see how people interact with your ads on Facebook, and provides information on things like the number of conversions generated by a campaign. When someone visits your site after interacting with one of your Facebook ads, the Facebook pixel collects data about that interaction and sends it to Facebook. This data can be used to help you measure the effectiveness of your ads and make adjustments if necessary. The Facebook pixel is an essential tool for optimizing campaign performance.
How does it work?
The Facebook pixel is a .js code that you add to your website to enable Facebook to track activity on your site. When one of your site's pages is loaded, the user's browser will also execute the corresponding script. Once triggered, this script will send a "notification", or more specifically a "hit", to the platform.
By "Facebook pixel", we mean "page view" conversion. However, you will need to set up as many scripts as necessary for the other events you wish to track (forms, additions to basket, purchases, etc.).
What is the purpose of the Facebook pixel?
Once you have installed the Facebook pixel on your website, you can do several things with it:
Track conversions and measure the effectiveness of your advertising campaigns.
The Facebook pixel lets you know how many people visit your website after seeing one of your ads, and it also helps you measure the success of your ads in terms of generating sales or leads.
Create personalized audiences.
Site visitors are associated with their respective Facebook accounts and identified by Facebook cookies on their devices. Facebook is therefore able to find out which people have carried out which actions on your site, while keeping the information confidential to you.
Thanks to the pixel, you can create personalized audiences based on the behavior of people visiting your website, for example "People who have added a product to the shopping cart". This audience will then be eligible for advertising - what we call remarketing.
This means you can target these people with specific ads that are likely to be more relevant to them, and improve your chances of converting.
For example, you could create a personalized audience of people who have visited your website in the last week and offer them a special deal.
Understand customer behavior.
The Facebook pixel also helps you understand the behavior of people who visit your website. This information can be used to improve the design of your website, as well as the content and presentation of your advertisements.
How do you install the Facebook pixel on your website?
First, you need to create a Pixel.
To create a pixel, connect to your Facebook account and go to the event manager.
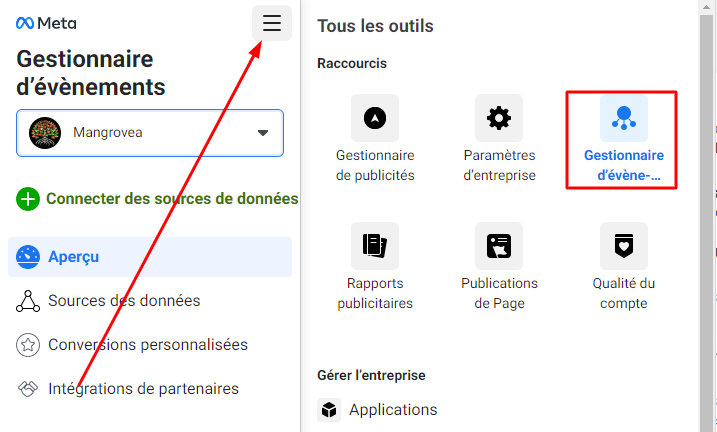
Then click on "Connect data".
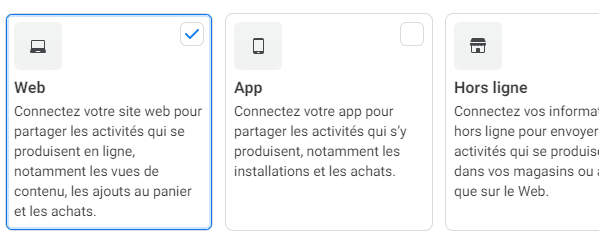
Select "WEB" from the menu on the left of the page.
Enter a name for your pixel and click on "Create". You'll receive a code that you'll need to install on your website.
There are several ways to install the code.
Installing the Facebook Pixel with Google Tag Manager [Recommended]
If you don't already have a Google Tag Manager account, you can create one for free at https://tagmanager.google.com/.
Once you've created an account, click on "Container" in the top menu bar, then select "New container".
Enter a name for your container and click on "Create". Then install your GTM container on your website, following Google's instructions.
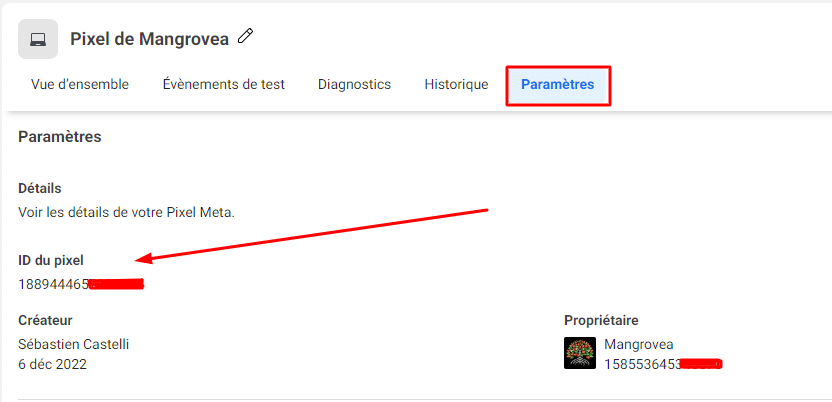
Back to Facebook, in your event manager select your newly created Pixel.
Click on Settings and copy the Pixel ID
Then go to Google Tag Manger and click on the "Tag" tab. Create a tag and find "Facebook Pixel" in the community template gallery.

Paste your pixel code into the tag's "pixel code" field and program your tag, selecting PageView as the event name.

Don't forget to add a trigger to your tag: Your pixel must be triggered on every page viewed [Modulo acceptance or refusal of tracking by your customers, we'll come back to this].
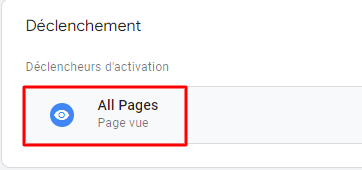
You'll now be able to track "Page View" conversions.
Repeat as many times as necessary to set up other events such as purchases, form submissions, additions to basket etc...
Installing the Facebook Pixel with a CMS / Pluggin [Beginner]
Practical solution for beginners, but a little less agile.
If you use a content management system (CMS), such as WordPress, there are plugins that will automatically add the pixel code for you:
On WordPress
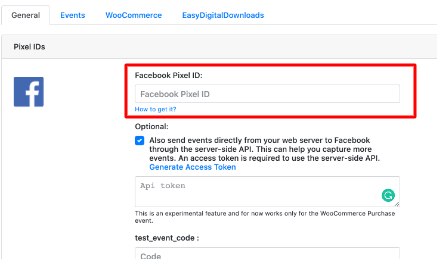
- Pixel Caffeine
After installing the plugin, go to "Settings" and enter the code for your Pixel. Every time a visitor views a page on your website, the Facebook Pixel will be triggered and you'll be able to track their behavior.
- Pixelyoursite
Pixelyoursite is a WordPress plugin that helps you install the Facebook pixel on your website. It's easy to use and takes just a few minutes to set up. Just enter your Pixel code in the plugin settings and you're ready to go.
Please note, however, that some features are not free of charge.
On Prestashop
- Module PrestaShop Facebook
- First and foremost, download the PrestaShop Facebook module
- Next, unzip the file and copy the "facebook" folder into the "/modules/" directory of your PrestaShop installation.
- Go to the "Modules" tab in your store's back office and click on the "Facebook" module.
- Enter your Pixel Code in the "Pixel Code" field and save your changes.
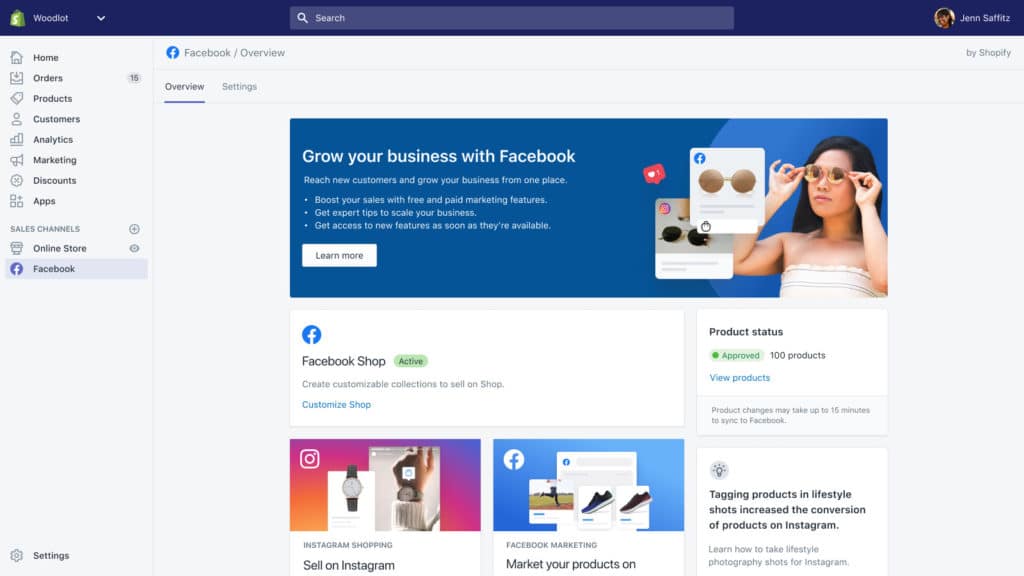
On Shopify
- Shopify native installation
To install the Facebook Pixel on Shopify, follow these steps:
- Go to your Shopify admin panel and click on "Settings".
- Click on "Pixel Facebook" and enter your Pixel code.
- Click on "Save
On Wix
- Native Wix installation
If you use Wix, you can install the Facebook Pixel and Conversions API by following these steps:
- On the left-hand side of the page, click on "Settings".
- Scroll down to the "Integrations" section and click on "Facebook Pixel".
- Copy the pixel code and paste it into the HTML code header of your website.
- Click on "Save changes
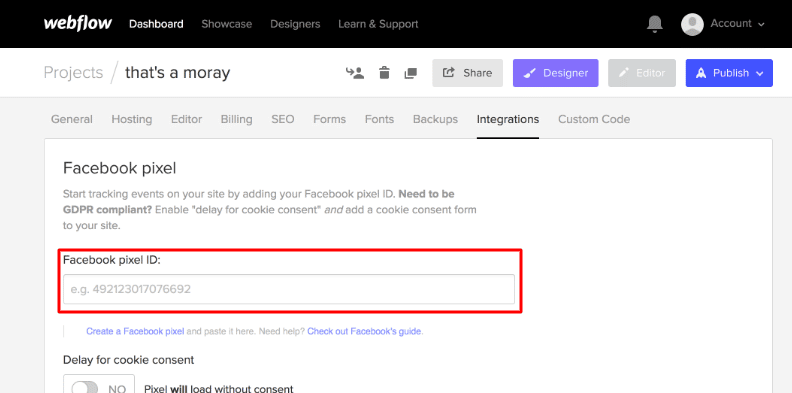
On Webflow
- Native Webflow installation
To integrate a Facebook pixel into your Webflow project, paste the pixel ID into project settings > integrations > Facebook pixel.
Manual installation [Not Recommended].
There are several reasons why manual installation of the Facebook pixel is not recommended. Firstly, it can be difficult to install correctly. Secondly, if the code isn't installed correctly, it can impact website performance and usability. Thirdly, if the Facebook pixel isn't installed correctly, you won't be able to track all your website's conversions or measure the effectiveness of your advertising campaigns. Finally, if you're not familiar with the code, it can be difficult to solve any problems that may arise.
To install :
1. Log in to your Facebook account and access the Ads Manager.
2. Click on the "Pixels" tab in the menu on the left of the screen.
3. Click on "Create a pixel
4. Enter a name for your pixel and click on "Create".
5. Click on "Continue Pixel configuration" and select manual addition.
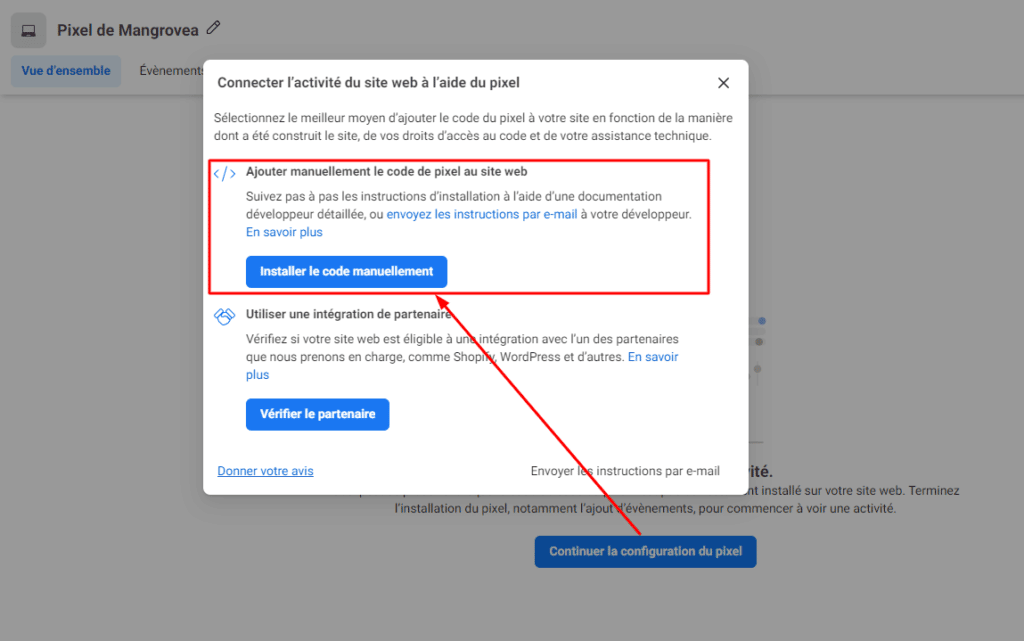
6. Paste the pixel code at the bottom of the title section, just above the tag. Install the base code on every page of your website.

7. Save your changes and test your site's homepage in a Web browser.
Check that Pixel Facebook is correctly installed
Facebook Pixel Helper
To check that the Pixel is installed, or if you encounter any difficulties, you can use the Facebook Pixel Helper Chrome extension to resolve any issues. The Facebook Pixel Helper extension is a free Chrome extension that helps you install and troubleshoot the Facebook Pixel. It also allows you to view the performance of your Facebook Pixel and track conversions on your website. To install the Facebook Pixel Helper extension, follow these steps:
1. Open a web browser and access the Chrome Web Store.
2. Type "Facebook Pixel Helper" in the search bar and press Enter. Alternatively, here's a direct link 🙂
3. Click on the "Add to Chrome" button, then click on "Add".
4. The Facebook Pixel Helper extension will be added to your list of extensions and will appear in your browser's toolbar.
5. To use the extension, open a web page and click on the extension.
6. The extension will show you information about the pixel code, including whether it's installed correctly and how it works.
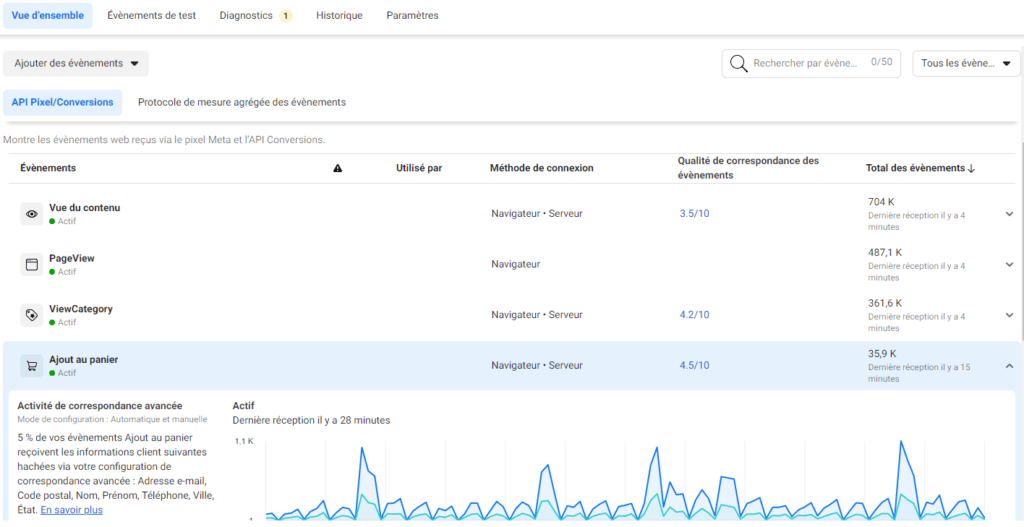
Facebook event manager
Overview
The Event Manager overview is the Facebook interface that presents a report of the various events received over a given period. You can go there to check.
You'll find a global view of all events sent to Facebook from your site.
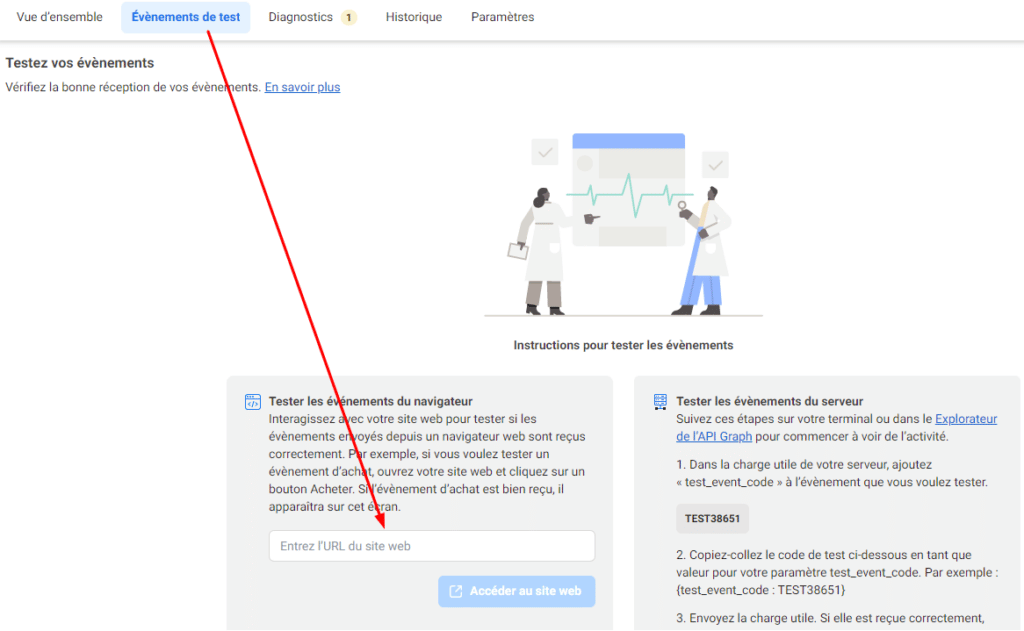
Test event
Beyond the general report presented in the overview, Facebook's test event section is used to test the functionality of your pixel. By creating a test event and sending it to Facebook, you can check that the pixel is installed correctly and that it is tracking conversions correctly.
What blocks the execution of Pixel Facebook
Blocking the execution of the Facebook pixel can have an impact on your website's performance and prevent you from tracking all your site's conversions. There are several reasons why this may happen.
including incorrect installation of the pixel code, browser extensions that prevent the pixel from working or firewall settings that block traffic to Facebook.com.
Adblocker-type extensions
Adblocker extensions like AdBlock are designed to block ads and protect privacy, so most block the Facebook Pixel from running.
App Tracking Transparency Apple since iOS 14
Apple has increased its focus on privacy in recent years, and it seems the company is no longer willing to cooperate with Facebook's data collection efforts.
Since Apple's iOS 14 update the Facebook Pixel no longer runs for users who refused ad tracking on Meta platforms when first opening the app. And there are a lot of them.
Consent Management Platform (CMP) or cookie banners
When a user arrives on a site, RGPD regulations in France require the user's consent to be collected for marketing purposes. These cookie banners or consent management platforms (CMPs) can block the Facebook pixel by preventing it from loading or deleting it after loading in the event of refusal or absence of consent on the part of the web user, when properly configured.
Conclusion
The Facebook pixel is a piece of code you install on your website to track conversions and measure the effectiveness of your ads. In this guide, we've shown you how to install the pixel and use it to track conversions. We've also provided some tips on how to solve common problems. If you have any questions or need help installing the pixel, please don't hesitate to contact our team of web tracking and data analysis experts!
Thank you for taking the time to read this article, if you have any comments I'd be delighted to discuss them in the comments, and please take the time to subscribe to our Mangrovea newsletter to get the most out of your Ads!